Dragon at Dawn Cross stitch

Dragon at Dawn Cross stitch Progress
Showing posts with label Tutorial. Show all posts

Friday, 10 March 2017

Starting out at Cross Stitch


Hi Everyone! As promised I have changed the name of the blog to Minerva's Treasures to better reflect the nature of this blog :)

I hope you all had a good day and you are ready to start setting up your crafting room with me :) I am going to have to go through all of this soon enough since I am changing houses and so far I have only decided that I want to have all the walls in my craft room painted white :)  In today's post we are not going to discuss the physical set up of the room, that will follow when I actually get my hands on it later on this year. Today I want to concentrate of the beginner cross stitcher and what is required to start off.


The first Step!
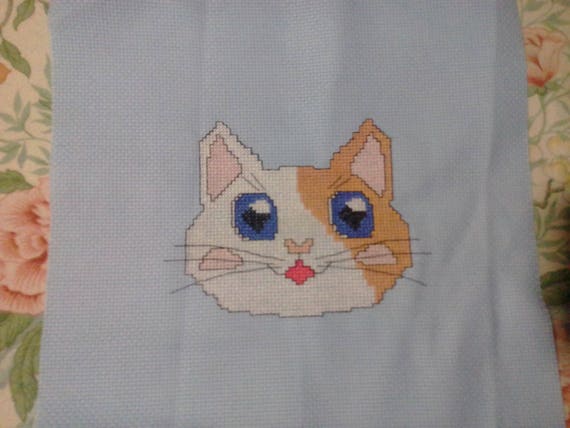
Patches the cat cross stitch pattern
Firstly you have to decided that you want to try your hand at cross stitching and be resolute about it. It is not a difficult technique but in order to make beautiful pictures you need to go to the more detailed stuff and those take a good deal of time.


Secondly;
After deciding whether this is for you or not, you need to choose a pattern that is suitable for a newbie, which consists of just whole cross stitches and a little back stitch. I have designed my own pattern and made it available in my Etsy shop here.

Three - Supplies
With the pattern in hand you need to shop for your supplies which consist of the colours of thread that the pattern specifies, a tapestry needle, a pair of small sharp scissors, a hoop or frame, and the Aida fabric. If you want to do Patches, you will need 14 count Aida fabric in Baby Blue or in any colour you prefer. I went for Blue because the pattern was designed with my son in mind and I also wanted the white part to show up.

Four - Test stitches
Next you need to practice your stitches before starting off working on your pattern. Take a piece of scrap fabric and follow the instructions as explained in this video below:


This is a very clear video with very simple and good explanations of how to do the basic cross stitch. I haven't filmed my tutorial yet so instead of sending you blindly looking up a video that is good enough, I did the research myself. And for the back stitch which is a little easier you can follow the video below:


This video will explain a little bit more the basics of cross stitch to make things simpler.


So after stocking up on your requirements and purchasing the kitty cat, you are ready to start! My finished piece is featured further up in the post. I would love to see your pictures of Patches!

Don't get frustrated, always remember that practice makes perfect!

I hope you enjoyed today's post and will see you later with another crafty post :) Happy Stitchy Weekend Everyone!!!! 

Pauline


Thursday, 24 July 2014

Weekly Manicure!


everyone! Sorry for being absent for so long, I keep from one day to another and the posts never write themselves up on their own!  Weekly manicure is back and this week I want to share with you a new product that I got from BornPrettyStore - Gold stickers!


This week's manicure uses the following products:
  • BK nail Polish in number 28 which is a very light pastel blue
  • Clear top coat by Debby ForPlay 1
  • Gold Filigree stickers from Born Pretty Store.

I also have a nailfile there to buff my nails because I had residue of gel nails before I did this manicure!

 I used the flowers to the right. There are two rows which were more than enough for this look!


First and foremost you must clean your nails becuase I find that pastel polishes are very susceptible to showing any small particles on the nails and form mini bubbles. I use a simple wipe down with polish remover and then give them a rinse with cold water.  Applying this particular BK polish is not very easy because the first coat looks aweful as you can see below, but just after two coats the nails look beautiful. I gave them 3 coats to make sure that I have a good coverage.  This particular polish smells of coconunts when it dries off and I can tell by the smell that the polish has dried. I always give it an extra 15 minutes in between coats so as to avoid any dents during application of other ornaments :)  The polish dries in minutes so a few extra won't harm.

That is one coat of polish


After you are satisfied with your colour, it is time to apply these gorgeous stickers. They come in a number of different designs on a transparent sheet, I chose the flowers and the wavy spots.  They are a little delicate and you have to have a pair of tweezers and mini sharp scissors handy.  Pull them gently out and cut the design you want. be carefull as the glue is very sticky and once you place them on your nails it is next to impossible to shift the position.  I decided to put the flowers all over the nails, keeping the half flowers for the corners of the nails and using the full ones depending on the size (as there are two sizes in the same strand) according to the nail size.  I finished off the design by applying the mini dots at the top of the nails.

This is the final look without the top coat.

The last step is very delicate with these stickers because if you are not carefull enough, the gold colour will fade away.  Fill up your topcoat brush with enough polish to cover the entire nail and try to apply it in one single gentle stroke without putting any pressure on the stickers. This will help not shifting the gold colour.  I tried skipping this step after the first nail had a little accident with the colour but I soon found out that even though the stickers are strong enough and stay on for a long time, the gold is dissolved by water and body washes. So try not to skip this step!

The end result is like a damask full of roses on a pale blue background.  It looks very complicated but is rather easy to do and I did get quite a lot of compliments :) People thought that I went to a nail technician and found it a little hard to believe that it was entirely my work!


I kept my nails on for as long as I could and here is the end result after 1 entire week where I did not bother too much to keep my hands away from house chores. Most of the flowers are still really gold!
Pretty impressive right!?! The durability of both stickers and polish is just amazing!  I love BK polishes so much because I can enjoy them for longer without worry to much about them!


If you would like to purchase the BK Polish and the Gold stickers click on the links below :)


18 Colors BK Sweet Candy Fast Dry Nail Art Polish/ 25-42#


10 styles Gold Lace 3D Nail Art Tips Stickers Manicure 223-232

Let me know your take at this design, or any other creative idea you create because I love seing your work! Post your pictures and comments down below and please stay tuned for more manicures in the coming days :) I plan to stick to weekly manicures for a long time :))

Thanks for reading!
Saranghae,
Pauline

Tuesday, 3 September 2013

Nail Art Stamping :)


Hi Ladies, it's time for another manicure. Today I will show you how to do your french tips using stamping tools. :)  All the items that I used (except for the Lioele Nail Hardener) were supplied to me by Born Pretty Store where you can get anything related to nails at the cheapest price and 10% cheaper if you used PCLG10 :)

So here we go!


Products used:

  • Lioele Nail hardener as base and top
  • Stamper and Scraper tools
  • Image Plate
  • Nail Art Polish
  • Polish remover and Cotton swabs
Step 1

As usual apply a base coat and leave it to dry really well!


Step 2

Make sure your nails are dry. Switch off any Air Conditioners or Fans as they will dry up your work before you even start. Choose the design you wish from your image plate and the Nail Art polish colour you like. I am using a red polish and  an animal print.  Fill the design with Nail polish and use the scraper to remove the excess, such that you only have polish left in the grooves of the design.


  Step 3

Pick up the pattern from the image plate using the stamper:


Step 4:

Transfer the pattern onto your nail very carefully. It will look something like this and don't worry if it looks matte.  Top coat is meant to give it the necessary shine :)


Step 5:

Finish off with top coat to seal the design and give the colour it's shine.

Here is a finished hand.  I guess you already noticed that I always portray my right hand! I am left handed so I can work steadier with the left. I need a lot of practice to steady my right hand but on the whole it's not that bad :) Plus my left hand has some shorties along with the nice nails :P


Overview:

I like the way this technique is done.  I just don't like the fact that you have to clean the design every other nail.  I tried not cleaning it and I only got 5 nails right.  I think that for starters, it is best to use a single design rather than a complete french tip as frenching requires a steady hand... my right hand is still messy!  Please clean the image with cotton buds so that you put some distance between your finished nails and the polish remover. I messed up quite a few nails before it dawned on me!

I truly recommend the products that I used, and you can get them from Born Pretty Store. I shall be linking everything in my  Favorite Nail Products page.  Don't forget to use Coupon Code PCLG10 for a 10% discount on your entire order and Shipping is Free WorldWide :)

I hope you enjoyed this tutorial and please don't hesitate to contact me if you need me to clarify anything!

Patience is a virtue with this kind of stuff but it is fun :)


Till next post,

Pauline 


Saturday, 31 August 2013

Weekly Manicure :) Ami and Sailor Mercury :)


So sorry for being so late in posting the Weekly Manicure but I had a little bit of experimenting to do :)

This manicure is going to serve a lot of tasks:

1.  It is a swatch and review of Etude House Ice Cream Nails in BL601 courtesy of W2Beauty
2.  It is a review and how to of striping tape courtesy of Born Pretty Store
3.  Phase one will be portraying Amy from Sailor Moon
4.  The complete manicure shall be portraying Sailor Mercury :)

Excited?   Let's get started :)


This is the base colour for the complete manicure. It is from Etude House's latest collection Ice Cream Nail in Blue BL601 which was sent to me from Alice of W2beauty as a gift with my previous hair care haul :)

This cute blue reminds me so much of Sailor Mercury's Bows that I decided it is the perfect shade to portray her both in her Senshi and Normal form.

I applied one coat of Nail hardener as a base, using my all time favourite Lioele Nail hardener which is running so low :(  The I painted my nails blue with one slightly thick coat of this cute blue. Here is a shot of the result :)

Hehe my nails aren't exactly clean and that's my desktop there :P

Well if you want you can stop here, apply a coat of top coat and clean the cuticles up, and you are ready :) 


I will be moving on to portraying Sailor Mercury!

To finish up the manicure I shall be using the following (the base colour is already finished):


Lioele Nail Hardener
Striping Tape in Metallic Blue and
Scissors (very shape)


Here is a close up of the striping tape.  This is easy to work with. All you have to do is peel the amount you need, place it on your nail and cut off the extras....but... you need a steady hand, a lot of patience and some immagination :)  I am going to show you how to do a simple design, firstly because it's my first time using tape and secondly, I don't want to scare everyone off with difficult stuff.

Basically what I am going to do is add two stripes to the side of each nail...they represent the stripes in Sailor Mercury's fuku or for those that are more of a motor head like me, they can be described as Racing stripes :)

Step 1:


I placed the tape to the far side of the nail and pressed it gently in a straight line. Avoid kinks as they will pull out faster.  Carefully I cut off the end.

Step 2:  Repeat the above placing the second stripe close to this one. Try to keep it straight as the gap in between the stripes will give you out if you slant it.

Step 3:  Apply a generous coat of top coat to keep everything in place.

Here is the result:

I have a dent in that nail there see... it got covered with striping tape :)


My opinion on the Striping Tape:

It is really useful to create crisp lines.  A steady hand is necessary to be able to move along without kinks. I applied the lines twice because the first time something went wrong and the taped turned silver. I am guessing it was because I washed my hands before applying the top coat.  The second time round the tape stayed a perfect metallic and the photo above is in fact showing the second set.  I had to be careful when pulling it off the roll as it can split from the centre.  It is also not useful for nail arts that are meant to last longer than 2 days as it starts pulling off at the tips.

Overall:

This tape deserved 4.5 Pink Diamonds:


I am reducing half a Diamond because it stays nice for a maximum of 3 days. I like to keep my manicures for a full week since I lack free time :)

You may purchase this tape from Born Pretty Store by following this link: Striping Tape  for only 99c of a dollar per roll :)


I hope you enjoyed this post and till next one,
Saranghae :)
Pauline


Thursday, 22 August 2013

Red Make up Tutorial


Today I want to share with you a mini make-up tutorial for a look that I wore last week during the fireworks display at Mqabba. I showed you the video in a previous post ;) The idea of red comes from the fact that the Fireworks Factory producing the show and the fireworks has red as its official colour so I wanted to match up to the occasion with red nails and red clothes and make up :)

The overall look is not difficult to achieve, basically all you need is your normal and usual concealers and foundations which I practically never use (even in this look, I didn't use them) and then you need a reddish brown eye shadow, a highlighter shadow, some black and silver eyeliners and black mascara.

I have used Maybelline One by One Mascara, Maybelline Master Drama eye liner in Black, Lioele Premium jewel eyeliner in silver and the eyeshadows are from a very old unbranded palette.


Lets move on to the how to part :)

I started off by drawing a small line with the black eyeliner at the outer corner of my eye and extended it outward. Then I joined the tip to the bottom lashline and drew it close to the lashes just under the iris. I did the same with the upper lashline. This in order to extend my eyes a bit.  That done, I moved to applying the eye shadows, first the reddish brown colour and then the highlight on top.  After that I went back to my black eyeliner and re-did the lines and darkened them up. I lined the waterline all the way including the inner corner and I stretched it up a bit on the top waterline.  I lined both upper and lower lashlines, underneath the black line with silver to add sparkle. The idea is to give the impression that the black line is the natural one and the silver is the eyeliner. That done, I applied two coats of mascara concentrating on the outer lashes to give a kitty effect :) I already have long lashes so, its not that difficult.

Here are a few close ups:


Please excuse the blurriness but the pictures are self-taken as usual :)


And this is the final look :)


I had a red top and black denim short skirt matched up with black and silver heels :)


This is the embroidery on the left side of the skirt, you see it on your right in the image above :)

My favourite silver and black heels :)

This has been in my wardrobe for ages and it still lokks amazing :)


I hope you guys understood what I was trying to explain because I am not really good at explaining make up tutorials :) Let me know what you think in the comments below :)

Till next post,
Saranghae,
Pauline