Dragon at Dawn Cross stitch

Dragon at Dawn Cross stitch Progress

Friday, 10 March 2017

Starting out at Cross Stitch


Hi Everyone! As promised I have changed the name of the blog to Minerva's Treasures to better reflect the nature of this blog :)

I hope you all had a good day and you are ready to start setting up your crafting room with me :) I am going to have to go through all of this soon enough since I am changing houses and so far I have only decided that I want to have all the walls in my craft room painted white :)  In today's post we are not going to discuss the physical set up of the room, that will follow when I actually get my hands on it later on this year. Today I want to concentrate of the beginner cross stitcher and what is required to start off.


The first Step!
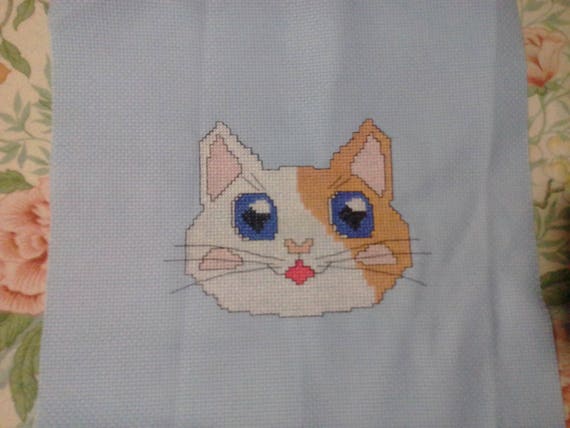
Patches the cat cross stitch pattern
Firstly you have to decided that you want to try your hand at cross stitching and be resolute about it. It is not a difficult technique but in order to make beautiful pictures you need to go to the more detailed stuff and those take a good deal of time.


Secondly;
After deciding whether this is for you or not, you need to choose a pattern that is suitable for a newbie, which consists of just whole cross stitches and a little back stitch. I have designed my own pattern and made it available in my Etsy shop here.

Three - Supplies
With the pattern in hand you need to shop for your supplies which consist of the colours of thread that the pattern specifies, a tapestry needle, a pair of small sharp scissors, a hoop or frame, and the Aida fabric. If you want to do Patches, you will need 14 count Aida fabric in Baby Blue or in any colour you prefer. I went for Blue because the pattern was designed with my son in mind and I also wanted the white part to show up.

Four - Test stitches
Next you need to practice your stitches before starting off working on your pattern. Take a piece of scrap fabric and follow the instructions as explained in this video below:


This is a very clear video with very simple and good explanations of how to do the basic cross stitch. I haven't filmed my tutorial yet so instead of sending you blindly looking up a video that is good enough, I did the research myself. And for the back stitch which is a little easier you can follow the video below:


This video will explain a little bit more the basics of cross stitch to make things simpler.


So after stocking up on your requirements and purchasing the kitty cat, you are ready to start! My finished piece is featured further up in the post. I would love to see your pictures of Patches!

Don't get frustrated, always remember that practice makes perfect!

I hope you enjoyed today's post and will see you later with another crafty post :) Happy Stitchy Weekend Everyone!!!! 

Pauline


Tuesday, 7 March 2017

MinervasTreasures

Hello everyone! It has been a really long while since I posted here. Time was not wasted though and I finally reached two milestones in life :)  

Firstly I have finalised all I needed so that I can move from the penthouse to a Maisonette with my own private door... no more common parts and having to climb or take a lift to the 4th floor! And I finally have a front porch, even though it consists of a flight of stairs to my front door, I can still have some potted plants on the boundary walls :)  This change means that I shall be over busy packing up everything in time for the eventual Big Move which is due this July in less than 18 weeks! My creative spirit is going to be slowed down quite a bit. In fact I already packed up most of my stitching and crafting resources and left only the cross stitch library available.

Secondly, I managed to finally finish stitching Patches the Cat which is a self-designed cross stitch pattern which I created for my little baby boy. I fine tuned it as I went along and now there is the pattern available for sale in my New Etsy Shop called MinervasTreasures :) I am linking the pattern down below. I really hope that it will be appreciated! You can click on the picture to shop the pattern :)


I have this idea, now that I have produced a very simple cross stitch pattern of a cute Kitty Cat, I was thinking on going around the stitching room and creating stuff that is useful and cute, keeping in mind a newbie who has just decided they wanted to start cross stitching.  With this in mind, here is the first pattern to use and learn how to cross stitch and it is cute enough, not just simple coloured boxes!

So I thought of changing the blog's name to Minervas Treasures to match up with my store and I will be posting blogs on how to set things up in your crafty room :) Stay tuned for the first post later on today :)

Pauline

Monday, 28 November 2016

Festive Monday Blues

Hi Everyone! I hope you all had a nice weekend and you are all up for another week, slowly getting closer to Christmas :)  It was a nice weekend here, all sunny and productive, I am working on another blanket present which I must finish in time and this one is a little big because it has to cater for a single bed :) I did run out of one of the colours and had to stop, but I made considerable progress.

On to what I wanted to talk about today. I was running around the streets window shopping and came across a lot of Blue, so I went to my favorite online store to check out some blue picks to fit in with the season's trends and decided to let you in on my finds. I saved this post for a Monday to also add it up to the Monday Blues theme :)

Starting off with a little classy casual top, here is a blue with black and white polka dots pattern. Perfect for the office :)


Then there was this cute lace embellished and slightly retro style top which I think is fun for the office as well. Black are just amazing together.


Below is another lacy top in a slighter brighter blue is more suitable for a classy casual look, but maybe not for an office.

Below is a more casual sweater in a mix of colours featuring blue as the main protagonist.


And the final blue top here is more suitable for a little romatic evening :)


Well I guess that is all for Monday Blues... I think I will go through some cool blue dresses for this season later on this week, and please look forward to a post filled with lots of glitz and glam to adorn these amazing tops and dresses.

Let me know what you guys think in the comments below and see you soon :)

Love
Pauline

Monday, 21 November 2016

Sunday Gardening

Image result for azalea double pink with white plant
Rhododendoron / Azalea
Hello everyone I hope you had a lovely week and a good weekend. Mine was a good week if you don't take into consideration the terrible rainy days we had and the weekend was fun too. We went shopping at one of the local Greenhouses and I got myself a pink and white flowered Rhododendoron, I have yet to check how to care for her, and I also got a peach amaryllis to add to my collection. I love pink flowers and bulbs. I got myself some planting soil to start planting out some bulbs which I got two weeks ago. 

Image result for narcissus white lion
White lion Narcissus should look like this one and if they all flower it will be a good show cause I got seven bulbs in one pot!
Here are a few pictures of what I got around the garden at the moment, or rather what I am expecting to have growing and flowering next spring. Oh, keep in mind my garden is in fact a bunch of pots and planters strewn around the house in sunny or shady spots depending on the plants. I don't have an actual garden, I am only blessed with huge windy terraces and hardly anything from my favorite plants can stand it out there.


Image result for pink hyacinths
Pink hyacinths should look like this with the only difference that I only got four bulbs.
Image result for peach amaryllis
My peach amaryllis should open up like this one.


So now in total I have planted some pink hyacinths and white lion narcissus. I have still to plant the anemones and the pink ranunculus. 


Image result for anemones flowers
The anemonies should give a show like these here.
In the evenings I was busy working in my craft room to finish off Ryan's Christmas present and I finally did it! It was on Saturday when I worked the last stitch on the star blanket and packed it up with a musical star projector turtle. My Christmas tree is not up yet so I couldn't place the present there yet but I was over the moon with the finish :) The little lion baby grow also made it to my doorstep and I am dying to dress him up :) I will share with you more about the star blanket in another post.
Image result for pink ranunculus
And I am so looking forward to have these show stoppers grow and flower. They are like paper roses!


I hope you found this garden update interesting and you liked the plants I choose and hope to see you soon  with an update on Christmas presents and nice blanket I finished for my little baby :)

Love
Pauline


Thursday, 17 November 2016

Christmas time :)

Hello everyone! It's been soooo long!

Another Christmas is creeping towards us and it is time to start preparing for the big day. I love this season the most and always look forward to it with high hopes and expectations. With my son at 1 year 1 month, I am curious how he will react when I start putting up the decorations.

Right now it is a stitching frenzy at home. I am almost done with Baby Ryan's Christmas star blanket, hopefully the hem will be finished off this week. His cute present and baby grow which will also serve as a Carnival Costume is already at home as well :) Then I am stitching up something for my sister as well but I am still light years away from the finish line! 

It is hard keeping up with the blog and life at home, when I work full time and then have to take care of the housework and my little baby, not to mention the dear husband who is forever seeking attention. Even my pets are getting the wrong side of the coin as of late. They are not being neglected but they're not getting all the cuddles that they deserve poor things.  Hopefully we will get into a good routine and everything will fall into place.

Today I would like to share with you a pair of shoes that I am dying to purchase for myself. Feel free to click on the image and buy your set cause it is amazing. They have it in different shades but the red one is amazing.

Stiletto Heel Pointed Toe Gradient Color Pumps
Buy Me


I have to get back to my desk now as lunch break is almost over and I have to crochet some granny squares for my little sister's christmas present. See you soon :)

Have a delightful day,
Pauline   Image result for kiss

Monday, 18 July 2016

Back :)

Hi Everyone!

I am finally back onto the blog :) It took me a while to come back because I was awfully busy with keeping up with work, household chores and most importantly pregnancy. I am happy to announce that I had a baby boy who is 9 months old today :) Now I am on a rush to finish off a lot of works in progress that are lying about my workshop room. If you noticed up in the header there is a new counter entiled Dragon at Dawn. This dragon piece must be finished before mid September as I wish to have it framed up before my son's birthday (October). So whilst I thank you for keeping up with my long disappearance, please look forward to some good updates coming your way. I shall be blogging about everything in life, and will no longer focus on one thing or another.

Update as at now:

I have just finished one of the long standing projects called Fish diamond painting, which I shall be posting a little picture of it soon enough.
I am working on a 100 row crochet piece of work that needs to be finished by the end of September.
I am working on Dragon at Dawn, a picture of which will follow shortly as well. This needs to be finished before mid-September to allow time for framing.
I am also working on decorating the landing to my penthouse. Pictures will follow shortly. This project is also almost ready.

Next up will be a post with pics of the projects so far. It takes a lot of effort to run a house, go to work and take care of a nine month old baby  but life is fun :)

See you all in a bit,

Cheers,
Pink Diamond

Wednesday, 24 June 2015

I'M Back!

Hi Guys and Girls, It's been a very loooonnnng time since I was here!  The reason behind it is that I'm expecting a little prince and can't really experiment anymore with cosmetics until delivery.  I did splurge on a new nail polish by L'Oreal though and it's fantastic and I can't wait to share it with you!

Anyways, I'm occupying my free time cross stitching, and have been working on lanarte's Beauty of Asia, desperately trying to finish it off because I need the frame for something bigger which I have already started using a small hoop. I have a new original that I am working on, called Daenerys and the Dragons, which I charted myself and am experimenting with a parking technique.  I wish I knew about it ages ago, I would have so much more stitching ready!

I am going to be keeping a meter on the side of the page to track my progress on it because the way I am working actually gives me the number of stitches completed :) And every now and again I shall be coming back with some pictures of works that are on the go or finished.

That's all for today, I got to get back to stitching Dany, (today I am on sick leave, stomach problems)

See you soon!
Pauline

Sunday, 11 January 2015

Welcome to 2015 :)


Hello Everyone! I'm Back after a VERY LONG absence :) I hope everyone had a good festive season and enjoyed with all your family and friends, and I wish everyone a good start to a new year, let's all hope this year brings good things to everyone!

I have been super busy with crafting during the last three months and that kept me away from here. This year I plan to make up for my absence and one of my resolutions is to keep this blog uptodate no matter what! My first target is to keep the weekly manicure on and I have changed it's date from Tuesday to the Weekend, so anytime between friday and sunday a manicure post shall come up every week :)  More sections will follow, but everyting depends on how good I manage my time. For the time being, I want to stick to the weekly manicure :)

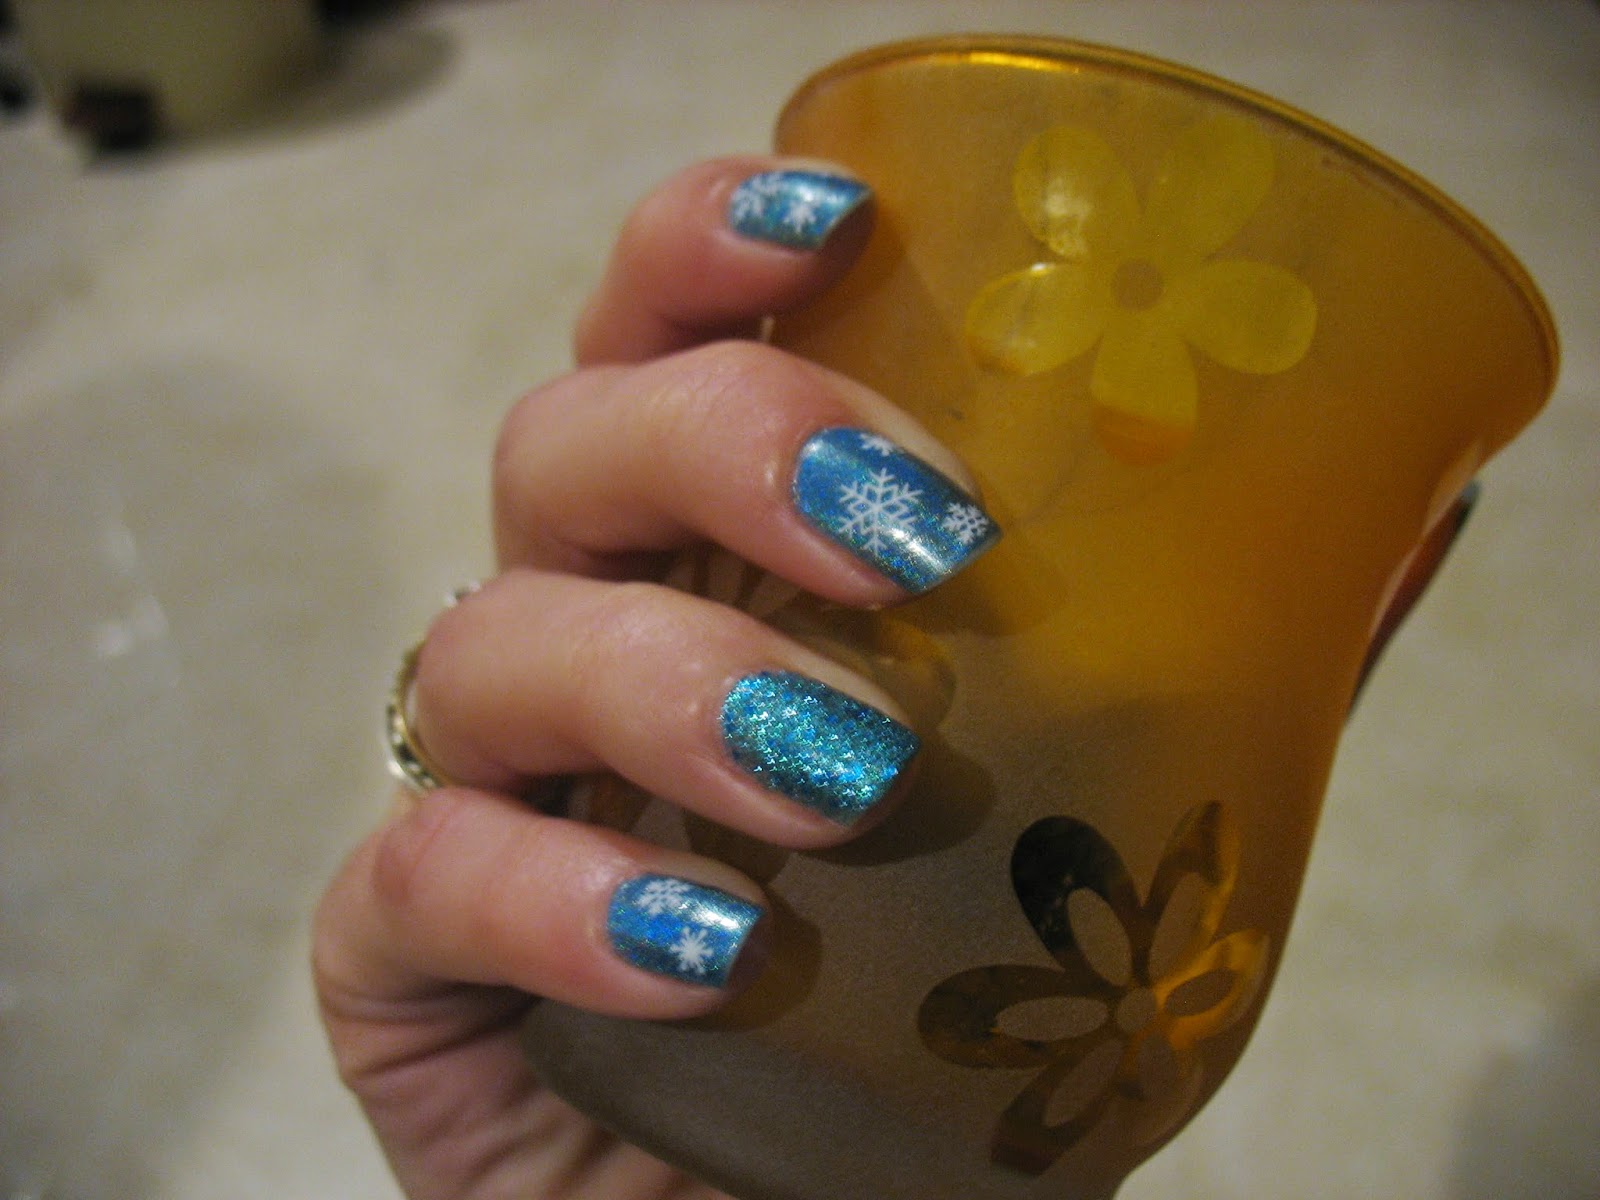
On with the show and for this week I have prepared a very festive manicure. It matches the winter season well and for those who are already looking for carnival inspiration and plan to do something princessy, today's look is perfect. Without further ado, let the characters below welcome you to today's Frozen Manicure :)


So for this manicure you will need the following products:

  • Bornprettystore Holographic polish in blue
  • Bornprettystore Water transfers - snowflakes
  • Golden Rose Glitter polish in turqoise
  • Any top coat of your choice - I am using one by Debby Play

The first thing that needs to be done is to clean the nails. This will ensure that the polish lasts long and applies well.  You may apply a coat of clear polish or base coat to protect your nails, but I can assure you that these particular polishes do not stain the nails.

As soon as you are sure that your base coat is completely dry, apply three coats of the holo polish to all your nails except the ring fingers. Make sure that all your nails are completely dry before applying the next coat. This will help prevent any mishaps.  Apply three coats of Golden rose glitter to the ring fingers.  Here is how it should look:


 It already looks great and can be left like this if you wish :) Just clean the overspills :P  I took this photo in indoor lighting and that's the reason why the holographic is not showing off it's best.  If you look at it in the sunlight it will shine in all the colours of the rainbow. It also shows well in a spotlit place (such as a lift)

The tray at the back is a small chinese sauce holder which I got from Lidl and is filled with water in order to float the transfers.  Don't forget to remove the protective film before you float them.

Next up you will need a small shallow plate and some water in order to float your snowflakes.  After floating the transfers, pick them up gently, I use my own fingers but you can use a pair of tweezers.  Place the snow flakes on the holographic nails in any pattern that you wish, tap them lightly with a tissue to remove excess water, then either wait for them to dry or else use a hair drier to be quicker.  Once all the water has been removed and the transfers aren't moving around on your nails, apply a coat of top coat or clear polish.

This is the final look:


We have been missing sunlight this week so I couldn't shoot a good photo to show off the holos in all its power but you can see a little flicker in the photo above.

I hope you like this week's Frozen inspired manicure :) Let me know what you think in the comments :)

If you wish to get hold of the holographic polish and the transfer decals you can visit Born Pretty Store by clicking here. They have an extensive variety of products to choose from and they are very affordable :)


That's all for today and I will talk to you again next week for another Weekend Manicure :)

Saranghae
Pauline


Tuesday, 4 November 2014

Weekly Manicure


Today I want to share with you a very summery manicure. It may be a bit out of season, but it can be worn in fall just the same, especially matched with some lively colours, after all it is still early fall right :)  

This manicure uses nail polishes by Etude House, the Ice Cream Nails which I got from W2Beauty and some nail stickers which were sent to me with one of my purchases from Born Pretty Store. I am sorry I can't link the stickers because I could not find the exact ones in the store, but there are tonnes from which you can choose from so it shouldn't be a problem finding the right design.


Here are the nail stickers which I was very pleasantly surprised when they started glowing in the dark when I went to bed :) They are a mix of bows and lacy edgings.


And these are the cute Ice Cream Nail Polishes by Etude House in Pink, Green and Blue.

Basically this look is very easy, all I did was paint my nails in different colours, you can choose which colours to make more nails of as you wish. I decided to have two blues and two pinks on each hand with just one nail in green. The thumb nail is in blue to match the little finger.

I then alternated between bows and lacy edgings as you can see below. The thumb has two white bows just like the little finger, because it is not very visible in the pictures.

To protect the stickers from coming off, I applied a top coat on top of everything and the resulting look is below.


The picture below was taken seven days after applying the manicure and as you can see, the polish is still intact and only one of the bows has lost a tiny piece :) These polishes are really long lasting and the top coat makes miracles when you have add ons :)


 I hope you found this post useful and you try to recreate this style in your own way :) Let me know what you think in the comments below and if you wish to get your hands on the products that I used, just follow the links to the stores on the side bar to the right :)

Till next Tuesday,
Saranghae,
Pauline


Tuesday, 28 October 2014

Weekly Manicure


Today I shall be sharing with you another shade from my BK Collection. Today it's number 26 which is a light peachy orange with a nice orangey smell just like it's sister colour number 25 which I shared with you last week.  This one also dries up quick and lasted for about 3 days without a top coat. It only took me two coats to get the perfect colour.

Here are some pictures of the finished look:


The pictures were taken on the third day and you can see some fading at the tips just like the one that I showed you last week. No need to repeat that this can be avoided by applying a top coat :)

This colour is mostly ideal for spring and autumn, because of it's light and not too vibrant colour and it matches quite a few colour schemes as well.

If you like this polish you can buy your by clicking on the picture below :)


As I advised last week, check back often to see whether the colours are all available and for their prices because they tend to change according to promotions.

I hope you found this review helpful :)

Till next Tuesday,
Saranghae,
Pauline

Monday, 27 October 2014

Craft Corner


Hello Again :) It's time for the fist post in the Craft Corner.  This corner is not going to be a weekly corner because making stuff takes quite some time, but every now and again I shall be updating you with my current Work In Progress (WIPs) and finishes.  For the first post in this section, I decided to give you a small tutorial on how to work with Ruffle Yarn and share with you two scarves that I have completed in the past few days and which I mentioned in the Fashion Friday section.

Before starting off with how to work with Ruffle Yarn, I want to explain what this novelty yarn is.  In reality is is noting like the traditional yarn that we are used to, but it is more like a wide fabric kind of yarn.  It comes in various shades and structures, but most of them have a kind of ladder on the top part where you are supposed to insert your knitting needles. When worked it creates ruffles and the way the ruffles turn on themselves is determined by how you pick up the stitches.

I will explain two ways of creating scarves using this yarn below but first let me show you the basics of working with it.

This is how the yarn is packed. This particular variety has different shades of grey and pompoms at its end.


 This is how it looks when you unwind it from the yarn ball. It doesn't look anything like a ruffle.

 And this is how it looks when you open it up. You can see the perforated ladder at the top part and the pompoms at the bottom of the ruffle.


 6mm Needles are the ideal size to work with these yarns.


 In order to pick up the stitches all you have to do is insert the needle from the front of your work into the ladder part.  I decided to work in between the first diamond block such that I have two threads on the needles in order to avoid it unravelling. Below is how the picked up stitches look.


When working with this yarn, you must always insert the needle from the front. To knit, all you have to do is insert the needle in the next hole on the ruffle and draw it in the loop on your needle as if kniting. Always turn your work when you get at the end of your row and turn the ruffle yarn accordingly such that there are no twists at the end but it looks more like a fold. Just like when folding a ribbon. When you are done, all you have to do is bind off normally. You will find that the last stitch will be hard to secure. I tied it up with the loose ends in the ruffle at the end, making sure that the knots were strong and tight enough.  If you don't have loose ends, you will have to sew it in the fabric of the ruffle with some matching thread and make sure that it is secured.

When you run out of yarn, don't worry! You either work all the yarn in one ball and work the next stitch with the new ball or else if you want to secure your work a little more, overlap the first two stitches of the new ball with the last two stitches of the last ball. There is no need to make any knots or join yarn :)

Scarf 1
The first scarf is made with shades of blue with yarn which was prepared by Lidl for their craft section.  The instructions that came with the pack require that the scarf is worked along the whole lenght of the scarf and advises that 200grams are necessary to finish it to a decent lenght.  It also explained that 80 stitches are what is needed to cover the entire lenght of the scarf.  I worked according to these instructions and the result is a nice ruffled scarf that when hung from the tip, the ruffles kind of circle in on themselves to form waves.  Here are some pictures:


  The picture is a little sideways but you can see the wavy ruffles.

 Scarf 2

The second scarf is worked differently. I decided to deviate from the instructions and instead of working along the lenght of the scarf, work along the width.  I decided that 10 stitches would be enough for a decent width and then worked all the yarn in the 4 bundles. The result was a slightly longer scarf that the blue one with ruffles overlaid on top of each other.

Here are some pictures:


Sorry about the picture being a litte sideways. You can see the ruffles are different from the blue one.


I hope you found this tutorial useful and if you wish to check out on some ideas on how to style these scarves, you can visit last week's Fashion Friday here.  I shall be featuring these two in other Fashion Friday posts and create new looks so look forward to that.  If you have no idea how to knit and don't know where to begin, if you live in Malta I would be more than glad to knit your scarf for just 5Euros, provided that you buy the yarn of your choice yourself :)  All you have to do is drop me a message below or on Facebook  here :)

Till next post,
Saranghae,
Pauline